Xcode 10でビルドしたアプリがiOS 9.0, 9.1, 9.2 でクラッシュしまくる件について
先日ようやっとiOS 12とXcode 10リリース後初のiOSアプリリリースをキメたんですが、
その後最新バージョンでクラッシュが急増する事態に。。。
クラッシュログを確認するとiOS 9でしか発生していない模様。
不思議だな〜と思いつつコード追ってみても原因がよく分からない。
諦めてググってみたところどうやら同様のクラッシュ事件でstackoverflowが盛り上がってる。
質問やそれに対するコメントをざっくりまとめてみると、
- Xcode 10 GMでビルドしたアプリがiOS 9でクラッシュするぜ
- Appleがバグと認定してる(バグチケットの作成を促している)
- iOS 9.3未満で発生する
- 何年もコードと画像を変更してなかったアプリでXcode10にした途端
[UIImage imageNamed:]でクラッシュする - Xcode 9でビルドしたら正常に動作する
well done,but It‘s unpractical for us.I think it is the xcasset's problem always.Xcode 10 release note and wwdc said xcassets has been optimized,it is a joke
hahaha
Swift 4.2 対応したばっかだしXcode 9に戻すのは気が引ける&iOS 9ユーザ多くないし静観するか〜と思っていた矢先、朗報。
Xcode 10.1 beta 2 Release Notes | Apple Developer Documentation
Resolves an issue that affected app compatibility with iOS 9.0, 9.1 and 9.2. Apps containing asset catalogs built with Xcode 10 whose deployment target was set to iOS 9.0, 9.1 or 9.2 would produce content incompatible with the runtimes of those iOS versions. Rebuilding the application with Xcode 10.1 resolves this issue. (44535967)
アセットカタログを含むデプロイターゲットiOS 9.0, 9.1, 9.2アプリがXcode 10でビルドされると、ランタイムと互換性のないコンテンツが生成される。Xcode 10.1で解決する
めでたし、めでたし。
モバイルアプリエンジニアのポートフォリオサイト「Project Showcase BETA」を試してみた
先日メールボックスにこのようなメールが。
Hey Toru,
I was searching for mobile developers by diving into the Swift stargazers on Github and came across to your profile. I see that you are a productive developer, especially CleanArchitectureChat is a great example. I believe you may find it useful to have a portfolio website to showcase your projects which I can help with.
スターゲイザーでは決してないのでどんなBotで引っかかったんやとは思いつつ、
How? I'm a founder of a startup that develops an online portfolio creator, called Project Showcase. It is especially designed and built for mobile developers. If you have any interest on mobile application development or if you have any application in the Play Store or App Store, you can exhibit them in your portfolio. It's so easy to use, you should give it a try.
Project Showcaseというサービスの宣伝でした。アプリエンジニアのポートフォリオって今までありそうでなかった気がするので気になって登録・利用してみたので紹介です。
管理画面はこんな感じ。

アプリエンジニア専用ということはなさそうですが、AppStoreとPlayStoreからアプリデータを取得してプロジェクトとして登録できる機能が中心となっているので、アプリエンジニアにとってはぽちぽちとするだけで今まで自分が作ったアプリがずらっと並んで見応えあるサイトになると思います。
ただ現状はアプリ検索に制限があります。
AppStoreに関してはiTunesの検索APIを利用してるのですが"country"パラメータをクエリに含んでいないためデフォルトのUSがアプリの配信対象に入ってないと検索に引っかかってくれません。
PlayStoreに関してはGoogleがAPIを提供していないようで、Project Showcaseチームが自分たちでホストしてるAPIを利用してるようです。なので中のロジックは皆目検討つきませんが、こちらも日本で配信してるアプリは検索結果に出てきてくれませんでした。
まだBETAなのでこれからの改善や機能追加に期待ですね。
こちらが私のポートフォリオです。
iOS 12で劇的に変わるPush通知の全貌
今更ですがWWDC2018のkeynoteを仕事と銘打って業務中に見まくっています。
WWDC 2018 - Videos - Apple Developer
数ある新機能の中でもiOS 12で劇的に変わりかつ影響範囲が大きい機能といえば「Push通知」ではないでしょうか。
今回はそんなiOS 12のPush通知についてまとめてみます。
- Provisional Authorization
- Grouped Notification
- Customize in App
他にもCritical Alertや通知のUI周りのトピックなどありますが今回は割愛します。
Provisional Authorization
今回紹介する3つの新機能の中でも目玉機能かと個人的には思っています。
今までPush通知の送信許可をユーザに要求する方法といえば、アプリを初めて開いた途端にダイアログを表示して要求したり、何かしらPush通知の内容紹介をしてから要求したりといったケースが一般的でした。
この今までの方法では実際にどんな通知が送られてくるか分からないのにユーザが判断を迫られるというある意味無謀な要求をしていました。
ところがiOS 12ではとうとうこの旧態依然とした機能にメスが入りました。
Provisional Authorizationはユーザにダイアログで許可を要求するのではなく、1通目のPush通知を勝手に送信してその時点で今後も通知を受け取りたいかどうか判断してもらうことができるようになる機能です。
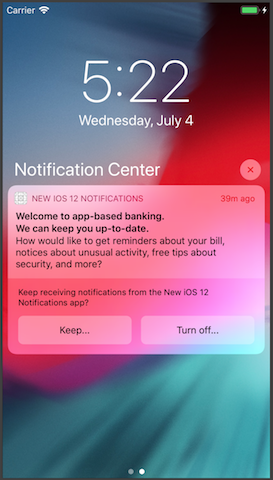
この方法ならばユーザが実際に通知を見てから判断するためとても理にかなっています。
もしかしたらPush通知の認可率も今までに比べて向上するかもしれませんね。
実装方法
UNUserNotificationCenterのrequestAuthorization(options:)のオプションに.provisinalを追加するだけです。
UNUserNotificationCenter.current().requestAuthorization(options: [.alert, .badge, .sound, .provisional])
Grouped Notification
Push通知がグルーピングされて表示されるようになります。
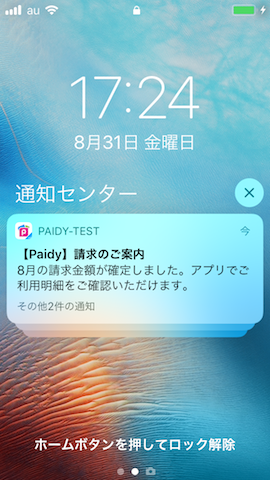
Push通知のペイロードに任意のデータとしてthread-idが追加され、グルーピングはこのID単位で行われます。
thread-idを指定しない場合はアプリ単位でグルーピングが実行されます。
ユースケースとしては例えば重要な通知がグルーピングされて隠れないようにするために別のthread-idを指定したり、通知の種類ごと(メッセージの受信といいね等)にthread-idを分けたりでしょうか。
ただ注意点として、たとえthread-idを指定して通知を送信したとしても、ユーザのiOS設定で「通知のグループ化:App別」になっている場合はアプリ単位でグルーピングされてしまいます。デフォルト設定は「自動」になっているみたいです。
実装方法
前述した通り、Push通知のペイロードにthread-idパラメータを指定することで実現できます。
Customize in App
iOSの設定アプリもしくは実際の通知からアプリ内の通知設定画面を開けるようになります。
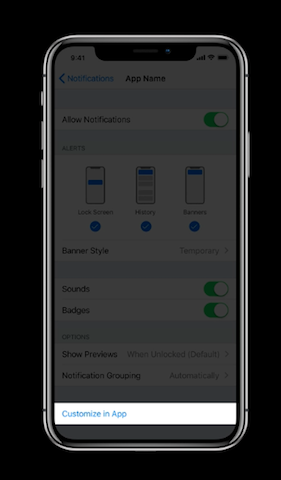
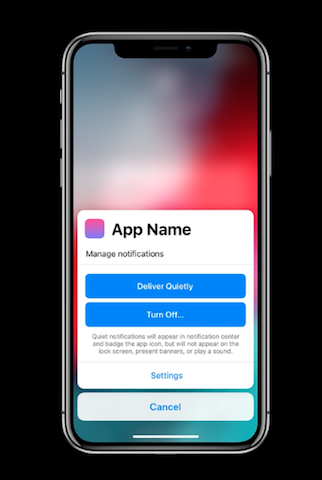
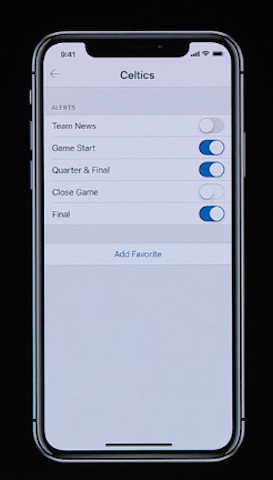
例えば通知の種類がいくつかありそれぞれに対してON/OFFを選択できるようなサービスにおいて、OFFにするための画面(iOS設定アプリや実際の通知)にアプリ内設定画面への導線を置くことで全ての通知をOFFにされるのを避けられることが期待されます。
実装方法
keynoteではDelegateメソッドさえ実装していればあとはOSが勝手に導線を作ると言っていますが、嘘ですlol
まずはUNUserNotificationCenterのrequestAuthorization(options:)のオプションに. providesAppNotificationSettingsを追加します。
UNUserNotificationCenter.current().requestAuthorization(options: [.alert, .badge, .sound, .providesAppNotificationSettings])
そしてUNUserNotificationCenterDelegateのuserNotificationCenter(_:openSettingsFor:)を実装して該当のアプリ画面を表示します。
Cloud Firestore iOS SDKをCarthageで組み込むとクラッシュするあなたへ
何も変えずにCarthageからCocoapodsに変更したら動いたのでやっぱ何かおかしい
— 無職に至りたい (@toru_furuya) August 20, 2018
コード
SDKの組み込みはCocoaPodsかCarthageかの違いだけで、あとは全て公式ドキュメントの通りに実装していきました。
Get started with Cloud Firestore | Firebase
import Firebase

FirebaseApp.configure()

let db = Firestore.firestore()

// Add a new document with a generated ID
var ref: DocumentReference? = nil
ref = db.collection("users").addDocument(data: [  // Crash here!!!
    "first": "Ada",
    "last": "Lovelace",
    "born": 1815
]) { err in
    if let err = err {
        print("Error adding document: \(err)")
    } else {
        print("Document added with ID: \(ref!.documentID)")
    }
}
ところがaddDocument()で実際にDBへ書き込みを行う時点でクラッシュが発生してしまいました。writeではなくreadだったらどうかと思い別のAPIも試しましたが同じ結果でした。エラーログにも特にヒントとなるようなログは見つけられませんでした。
原因
FireStoreのSDKはリソースバンドルを含んでいて、そのバンドルをアプリに組み込む必要があるようです。Firebase iOS SDKのgithubレポジトリのCarthage.mdにちゃんと書いてありました。ビルド設定を色々調べたりリンクするライブラリが足りないんじゃないかと悩んで1時間ほど無駄にしたのが情けない。
firebase-ios-sdk/Carthage.md at master · firebase/firebase-ios-sdk · GitHub
If you're including a Firebase component that has resources, copy its bundles into the Xcode project and make sure they're added to the
Copy Bundle ResourcesBuild Phase :
- For Firestore:
-./Carthage/Build/iOS/gRPC.framework/gRPCCertificates.bundle
私と同じようなズボラな方の役に立てれば幸いです。
SideMenuライブラリでツールバーの見た目を変更できない原因と解決方法
問題
アプリ側のステータスバーの見た目とSideMenuで表示するメニュー側のステータスバーの見た目を変えるために、以下のような実装を行なった。
import SideMenu

let menuLeftNavigationController = UISideMenuNavigationController(rootViewController: MenuViewController())
SideMenuManager.default.menuLeftNavigationController = menuLeftNavigationController
SideMenuManager.default.menuWidth = 280
SideMenuManager.default.menuPresentMode = .viewSlideInOut
class MenuViewController: UIViewController {
    override var preferredStatusBarStyle: UIStatusBarStyle {
        return .lightContent
    }
}
しかしMenuViewControllerのpreferredStatusBarStyleは実行されず、期待した動作にならなかった。
原因
SideMenuのコードを読んでみると、SideMenuManagerにNavigationControllerをセットしたタイミングで、そのNavigationControllerのmodalPresentationStyleが.overFullScreenに変更されてしまっていた。
    fileprivate func setupNavigationController(_ forMenu: UISideMenuNavigationController?, leftSide: Bool) {
        guard let forMenu = forMenu else {
            return
        }

        forMenu.transitioningDelegate = transition
        forMenu.modalPresentationStyle = .overFullScreen
        forMenu.leftSide = leftSide
        ...
公式ドキュメントによると、ViewControllerをpresent(_:animated:completion:)で表示する時、ステータスバーの見た目のコントロールは表示する側から表示される側に移る。ただし表示される側のmodalPresentationStyleが.fullScreenの時だけね🤪
When you present a view controller by calling the present(_:animated:completion:) method, status bar appearance control is transferred from the presenting to the presented view controller only if the presented controller's modalPresentationStyle value is UIModalPresentationStyle.fullScreen.
modalPresentationCapturesStatusBarAppearance - UIViewController | Apple Developer Documentation
解決法
SideMenuのNavigationControllerのmodalPresentationCapturesStatusBarAppearanceをtrueに設定する。
// modalPresentationStyle become .overFullScreen as set to menuLeftNavigationController.
// Set this property true in order to make sure that status bar appearance control
// is transferred from the presenting to the presented view controller.
menuLeftNavigationController.modalPresentationCapturesStatusBarAppearance = true
こうすることでMenuViewControllerのmodalPresentationStyleの値に関わらずoverrideしたpreferredStatusBarStyleが実行されるようになり期待した動作になる。
Travis CIのxcode9.4イメージにbundlerがプリインストールされてない模様
Travis CIのosx_image: xcode9.4がリリースされたので試してみました。
✨Xcode 9.4 is here! 🚀Set ‘osx_image: xcode9.4’ in your .yml file and you’re off to the races. As always, if you have any questions or something doesn’t work as expected, we can be reached at support@travis-ci.com Read more here: https://t.co/kxZyIa8iJw
— Travis CI (@travisci) 2018年6月15日
しかしbefore_installでエラー発生。どうやらbundlerが見つかってない模様です。osx_image: xcode9.3までは正常に動作していたのですが、9.4にしただけでビルドがこけるようになってしまいました。
$ sudo bundle install
/Users/travis/.rvm/rubies/ruby-2.4.3/lib/ruby/2.4.0/rubygems.rb:271:in `find_spec_for_exe': can't find gem bundler (>= 0.a) (Gem::GemNotFoundException)
   from /Users/travis/.rvm/rubies/ruby-2.4.3/lib/ruby/2.4.0/rubygems.rb:299:in `activate_bin_path'
  from /Users/travis/.rvm/gems/ruby-2.4.3/bin/bundle:23:in `<main>'
    from /Users/travis/.rvm/gems/ruby-2.4.3/bin/ruby_executable_hooks:15:in `eval'
  from /Users/travis/.rvm/gems/ruby-2.4.3/bin/ruby_executable_hooks:15:in `<main>'

The command "sudo bundle install" failed and exited with 1 during .
公式ドキュメントのプリインストールされてるGem一覧には変わらずbundlerも含まれています。
The OS X Build Environment - Travis CI
- bundler
- rake
- cocoapods
ということでGithubにissue作りました。どんなカンバセーションがされるでしょうか。
追記
時間がかかりましたが、Travisのissueで返答がありました。
root ユーザではbundlerが使えなかったみたいです。ということでsudo bundle installからbundle installに変更すればokでした。
osx_image: xcode9.4 doesn't have bundler · Issue #9759 · travis-ci/travis-ci · GitHub
Travis CIでCarthageのビルドをキャッシュして幸せになる
目的
- Travis CIのPull RequestビルドでCarthageを毎回ビルドしない
- git repositoryにCarthageのビルド成果物をコミットしないで実現する
Pull Requestビルドの概要
公式ドキュメントを覗いてみます。
Caching Dependencies and Directories - Travis CI
Pull Requestのビルドは以下のキャッシュを確認して最初に見つかったものを利用する。
- 対象のPull Requestのキャッシュ
- 対象のPull Requestのターゲットブランチのキャッシュ
- git repositoryのデフォルトブランチのキャッシュ
もし上記すべてのキャッシュが存在しない場合はキャッシュなしでビルドが実行される。
最初のPull Requestビルドが終了した後に、新しくPull Requestキャッシュが作成される。(つまり上記リストの1.はPull Requestの初回ビルドでは存在しない)
やってみる
- ターゲットブランチ:
develop(ブランチキャッシュはすでに存在) - デフォルトブランチ:
master
.travis.yml
cache:
  directories:
    - Carthage
featureブランチ -> develop へPRを作成します。 キャッシュが効いていたらCarthageのビルドが走らないため6分程度で終わるはずです。

...時間がかかり過ぎています。
原因を特定するためにTravisのログを見てみます。
Setting up build cache
$ export CASHER_DIR=$HOME/.casher
$ Installing caching utilities

attempting to download cache archive
fetching PR.118/cache-osx-xcode9.3-e3b0c44298fc1c149afbf4c8996fb92427ae41e4649b934ca495991b7852b855--rvm-default--gemfile-Gemfile.tgz
fetching PR.118/cache--rvm-default--gemfile-Gemfile.tgz
fetching master/cache-osx-xcode9.3-e3b0c44298fc1c149afbf4c8996fb92427ae41e4649b934ca495991b7852b855--rvm-default--gemfile-Gemfile.tgz
fetching master/cache--rvm-default--gemfile-Gemfile.tgz

could not download cache
fetching... の内容がキャッシュの存在確認のようですが、Pull Requestキャッシュとmasterブランチキャッシュしか確認してないように見えます。
公式ドキュメントの内容が正だとしたらTravis CIのバグのような気がしますが、とりあえずdevelopブランチをデフォルトブランチに設定して別のPRを試してみます。(同じPRだとすでにPull Requestキャッシュが作成されてしまって検証にならないため)

17分から6分に短縮することができました。
Travisのログを見てみてもdevelopブランチのキャッシュを確認していることが分かります。
Setting up build cache
$ export CASHER_DIR=$HOME/.casher
$ Installing caching utilities

attempting to download cache archive
fetching PR.124/cache-osx-xcode9.3-e3b0c44298fc1c149afbf4c8996fb92427ae41e4649b934ca495991b7852b855--rvm-default--gemfile-Gemfile.tgz
fetching PR.124/cache--rvm-default--gemfile-Gemfile.tgz
fetching develop/cache-osx-xcode9.3-e3b0c44298fc1c149afbf4c8996fb92427ae41e4649b934ca495991b7852b855--rvm-default--gemfile-Gemfile.tgz

found cache
結論
- Travis CIのPull Requestビルドはターゲットブランチのブランチキャッシュを確認してくれない
- 公式ドキュメントが正だとしたら上記の挙動はTravis CIのバグの可能性
- git repositoryのデフォルトブランチをうまく設定することで、初回ビルドからTravis CIのキャッシュ機構の恩恵を受けることができる(今回の例ではdevelopを利用しましたがmasterでもビルドするような環境の場合はmasterでも大丈夫なはず)
また以前別エントリで記載したように、CI時のビルド時間短縮の観点から、Carthageを利用するアプリでCarthageフォルダをgit repositoryにコミットするか否か迷っていましたが、Travis CIを利用する場合はキャッシュ機構が備わっているためgit repositoryにコミットしなくて済みrepositoryをクリーンに保てるので良いですね。